
Before you can do anything, you need a quiz that users can fill out. For this, we will be using the Gravity Forms Quiz Add-On. If you’ve never used the Quiz add-on before we recommend following Gravity Forms guide before you proceed any further so you can become familiar with it. Done? Great!
Now, if you plan to follow along with us as we build this, you can download this Gravity Forms export (right click and save as) and import it onto your site. This will save you having to come up with a bunch of questions.

Setting up a quiz using the Gravity Forms Quiz Add-On
If you’re creating your own quiz (and not using the sample form provided), go ahead and add questions to the form you are working on. Click the Save Form button (usually in the top-right of the screen) to finish creating your quiz questions, then enable the grading feature in the quiz form settings.
The Template Section is up next and this is my favourite! That’s because these settings are defined by the template itself and will change depending on which one you select. This makes for some pretty powerful and customizable PDFs.
As mentioned earlier, we chose Barot for the template so we’ll be guiding you through the settings we used for this tutorial.

- The Main Heading is displayed at the start of any PDF template. Here I put Test Report, but if you want to use your own heading go ahead. Hot tip: you can use Gravity Forms merge tags in this field. If you don’t want a heading you can leave this setting blank.
- You can include a Logo / Image in the Header by uploading the file from your Media Library. In the video above, you can see that I’ve uploaded a 500px wide logo, which is suitable in most cases to ensure that the PDF generates optimally.
- For the Header Background Color, click on the Select Color button to use the color palette. Drag the color picker to select any color you like, or copy/paste a HTML color code at the right side of the button. For this example, I used the color
#F2C784. - If you’re working on a form with a lot of content, use the First Page Header setting to only show the header on page 1. Because we’re only working on a small form, we will leave this setting disabled.
- I used the color
#FDF0D8for the Footer Color Background, and the default (#000000) for the Footer Font Color. Again, suit yourself by mixing and matching these colors to match your brand’s style. The sky’s the limit! - The Footer Content is displayed at the bottom of any PDF template. This is best used to include any additional information: be it text, an image, or both. If you wish to insert a logo / image, try keep the image width 500px or under for a smaller file size and faster PDF generation.
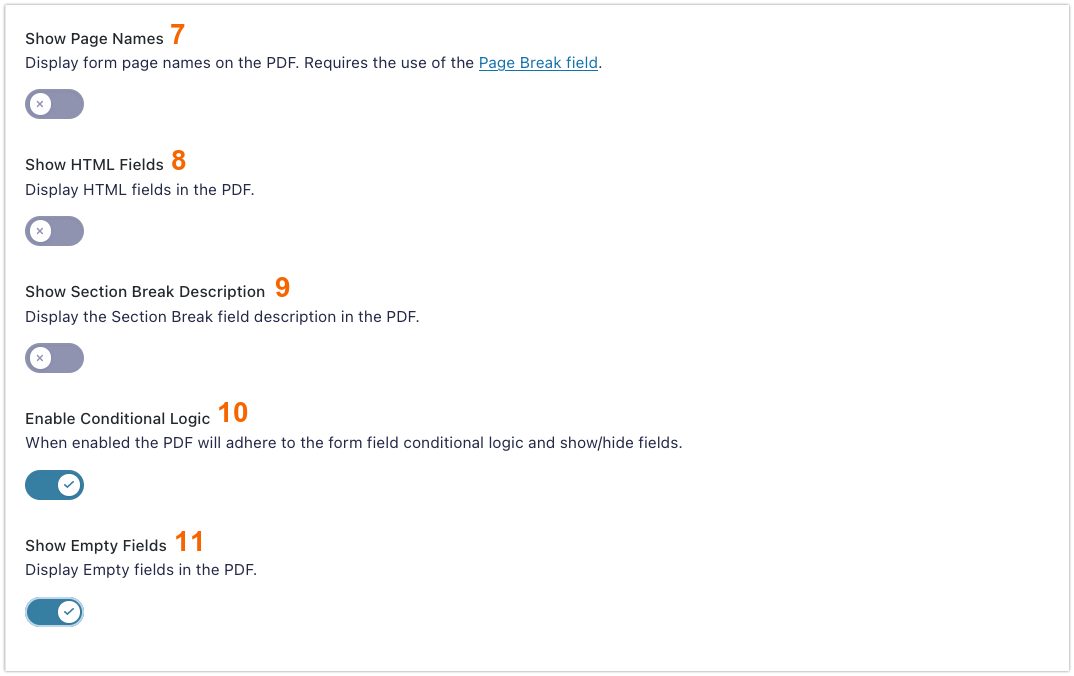
7. If you’re using a Gravity Forms Page Break field, you can enable Show Page Names to display the form page names on the PDF. As we’re not using any, we’ll just leave this disabled (default).
8. If you’re using HTML fields in your form, you can enable Show HTML Fields to display them on the PDF. Otherwise, leave it disabled. 🔥 Hot Tip: you can use hidden, conditional, HTML fields that only display in the PDF to provide in-depth feedback in your report. See this video tutorial on how to correctly configure this.
9. By default, Section Break labels are automatically displayed on the PDF without the description. If you want to include the description too, enable Show Section Break Description. Again, for this example we will leave it disabled.
10. Enable Conditional Logic is on by default and ensures fields will be shown/hidden in the PDF based on their conditional logic. Leave this enabled.
11. By default, any field not completed in the form isn’t included in the PDF. If you prefer all empty fields to still show up, enable the Show Empty Fields setting. We’re enabling it in this PDF because we want to quickly show any fields that a user hasn’t completed.
We aren’t going to make any changes under the Advanced section for this document, so you can skip over it. Once you’re happy with everything do one last save/update.
Gravity PDF Invoice templates can be used with any Gravity Forms, as long as your form contains a Product Field. Because your form doesn’t have any products yet go back and edit your form. Under the Pricing Fields section is the Product field. Go ahead and add it, set a price, and disable the quantity field.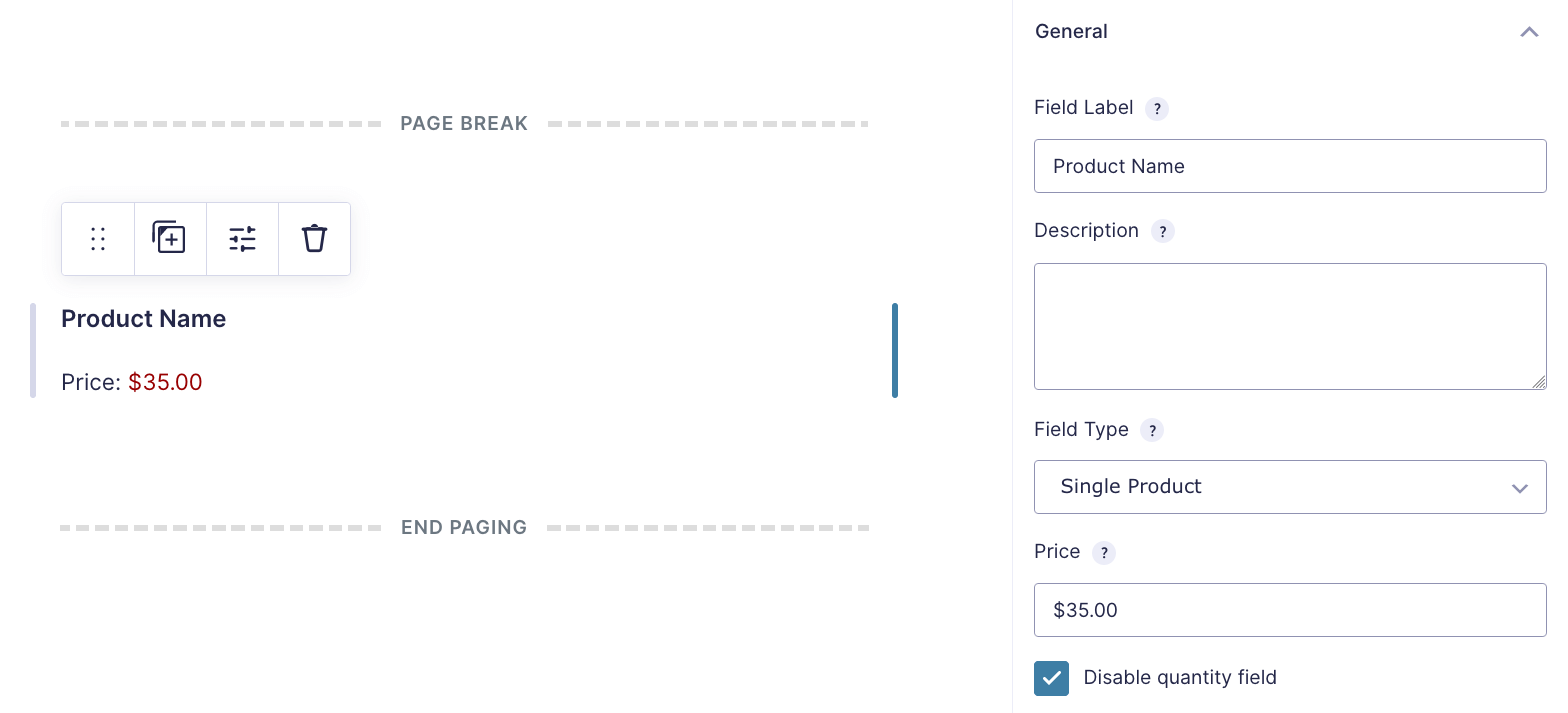 For our example, I’ve set the price to $35. Click on Save Form to update the form.
Before we set up the Invoice PDF, there is one other problem we need to resolve before we continue. If you submit the form again with the new product field included and then view your PDF report, you’ll see a new Order table included right at the end. That’s not ideal, so we’ll go ahead and remove it. To do this we’ll take advantage of the mighty Gravity PDF Core Booster Extension. If you already have this extension installed, congrats! If not, don’t worry! You can visit our online store to grab yourself a copy.
If this is your first time using the Core Booster extension, I recommend you quickly review the documentation first to familiarize yourself with its suite of features. Otherwise, let’s proceed!
 In order to hide the product field we just added to the form, go back to the report PDF settings and locate the Group Products setting under the Template section. This is one of the new features Core Booster adds to any Core or Universal template. Select the No Products option and save. When you review the report PDF again you’ll note the order table has been removed. Easy, right?
Next, jump down to the Template section. Gravity PDF Invoice Templates are all highly customizable with a heap of unique features!
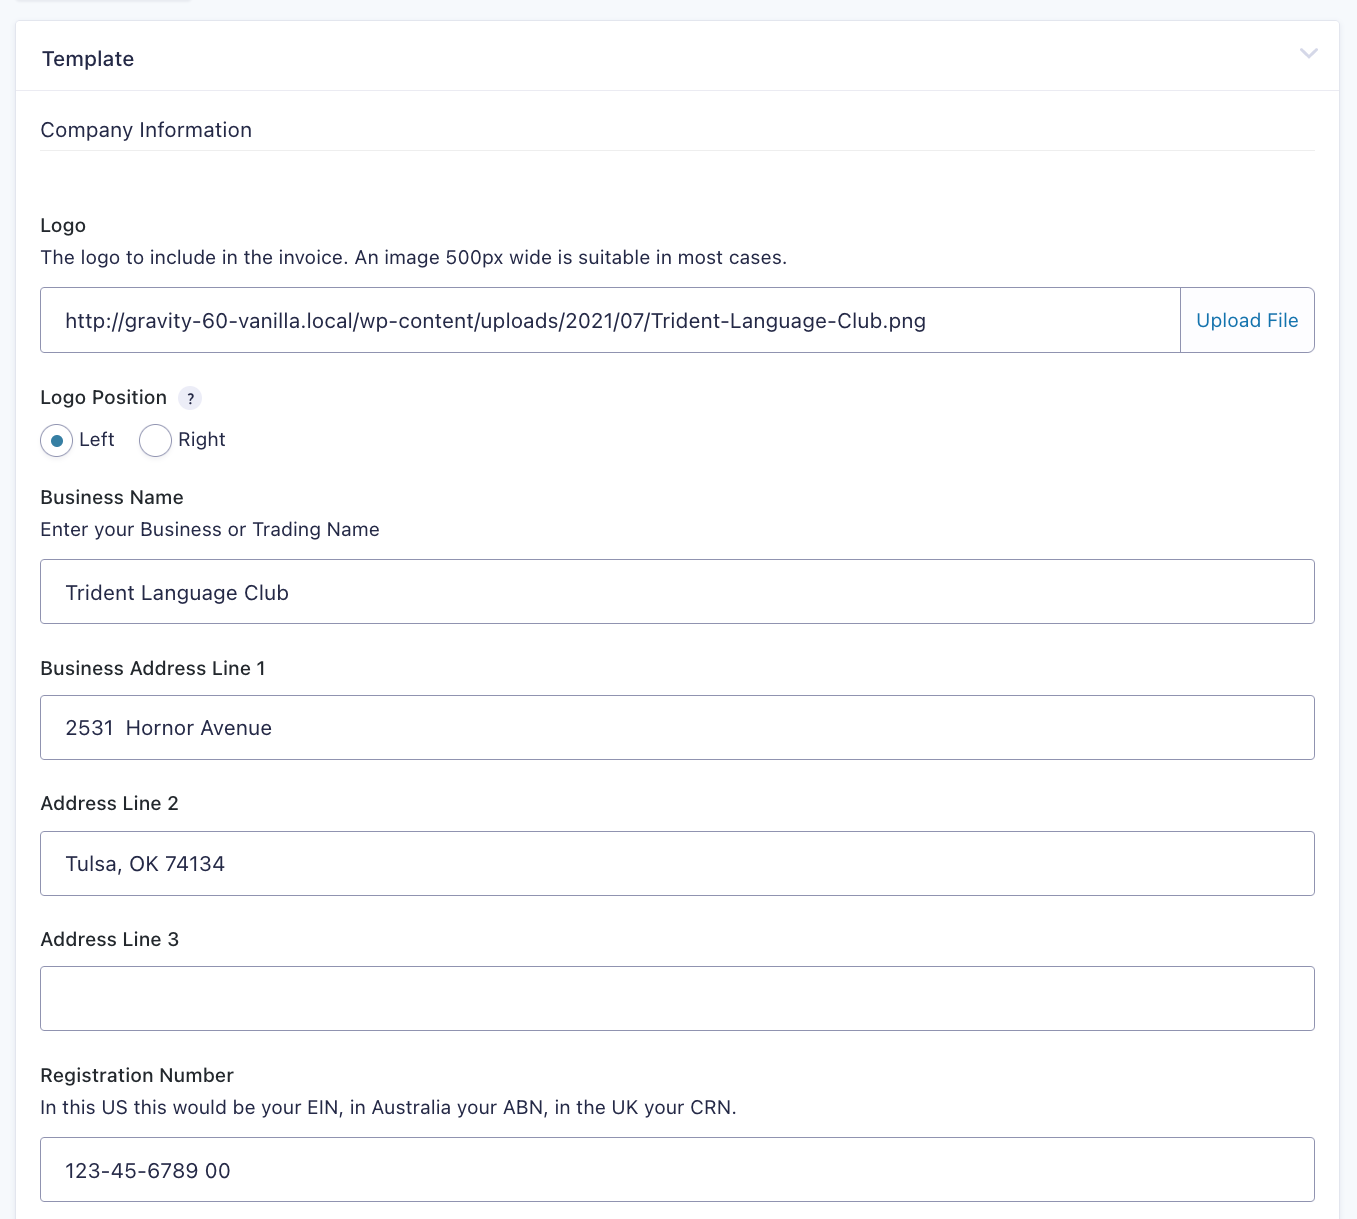
Do take your time and customize the Invoice template to your liking. Most of these settings are straightforward, but if you get stuck each Template has its own detailed documentation to help you better understand and utilize all of the available settings. Once you’re done, click Add PDF (or Update PDF for existing PDFs) to save all the changes you’ve made.
Hot tip: Use Gravity Perks Unique ID extension to create a sequential invoice number for your form and use it in the invoice instead of the entry ID.

Invoice Template Aurora
To check if the Invoice PDF is working properly go to the Entries List Page, hover over the latest/first entry in the list, and then over View PDFs link. This time you’ll have two PDFs to choose from. Select the second option and then review your awesome Invoice PDF document. Refine any of your PDF settings as needed.
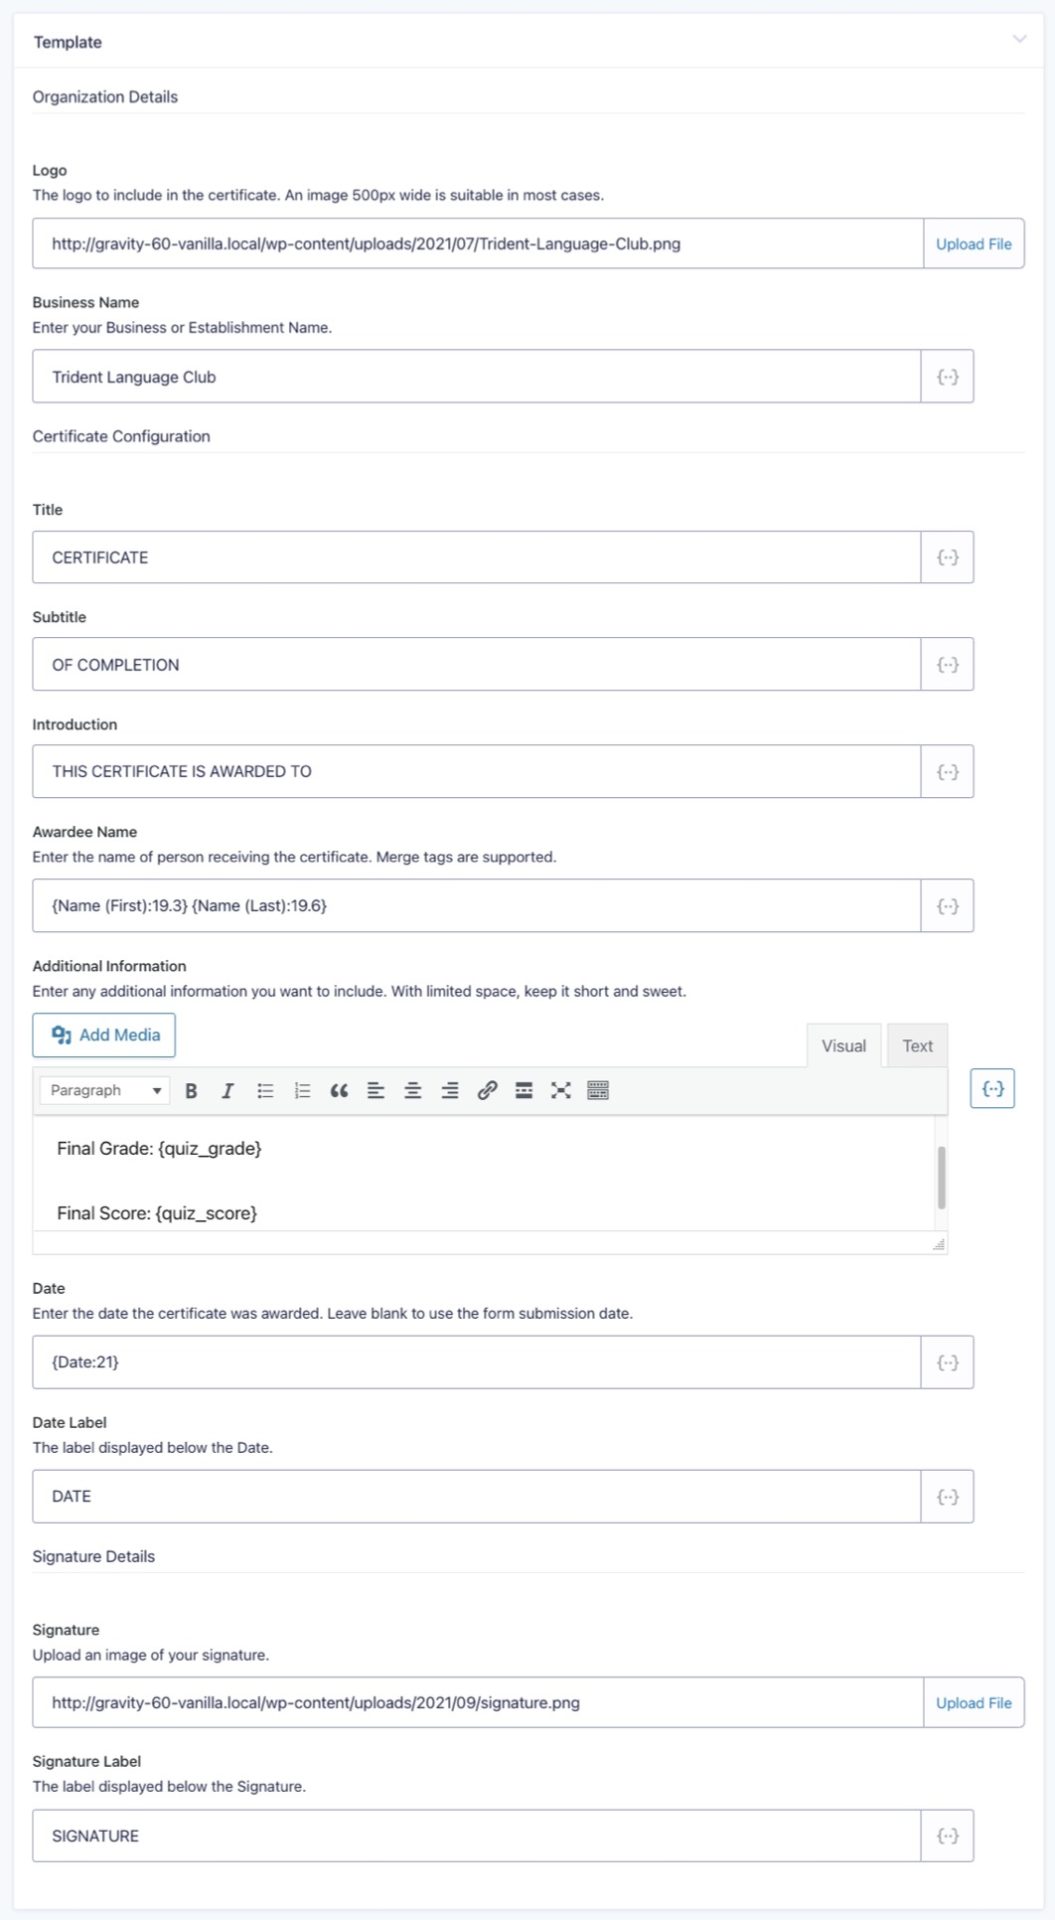
Gravity PDF certificate templates are not yet available for purchase, but they’re in the pipeline (contact us if you’re interested in early access).

Certificate Template Montgomery
This classy-looking certificate is just one of the many Gravity PDF Certificate templates that will be added to our Template shop.
The process of setting up a Certificate PDF is similar to how you would with any other Gravity PDF document. You are given the freedom to configure what gets displayed in your certificate. Below is the settings we used for this particular example.
It’s time to finally sell your personalized documents! This step requires you to have a Gravity Forms license that gives you access to a Gravity Forms Payment Add-Ons. For this How To, we’ll be using the Stripe and PayPal Checkout add-ons, but Gravity Forms offers a variety of official payment add-ons, so check them out to see what works best in your scenario.
Because I want to use multiple payment options, I’ll show you how to correctly set up Conditional Payments.
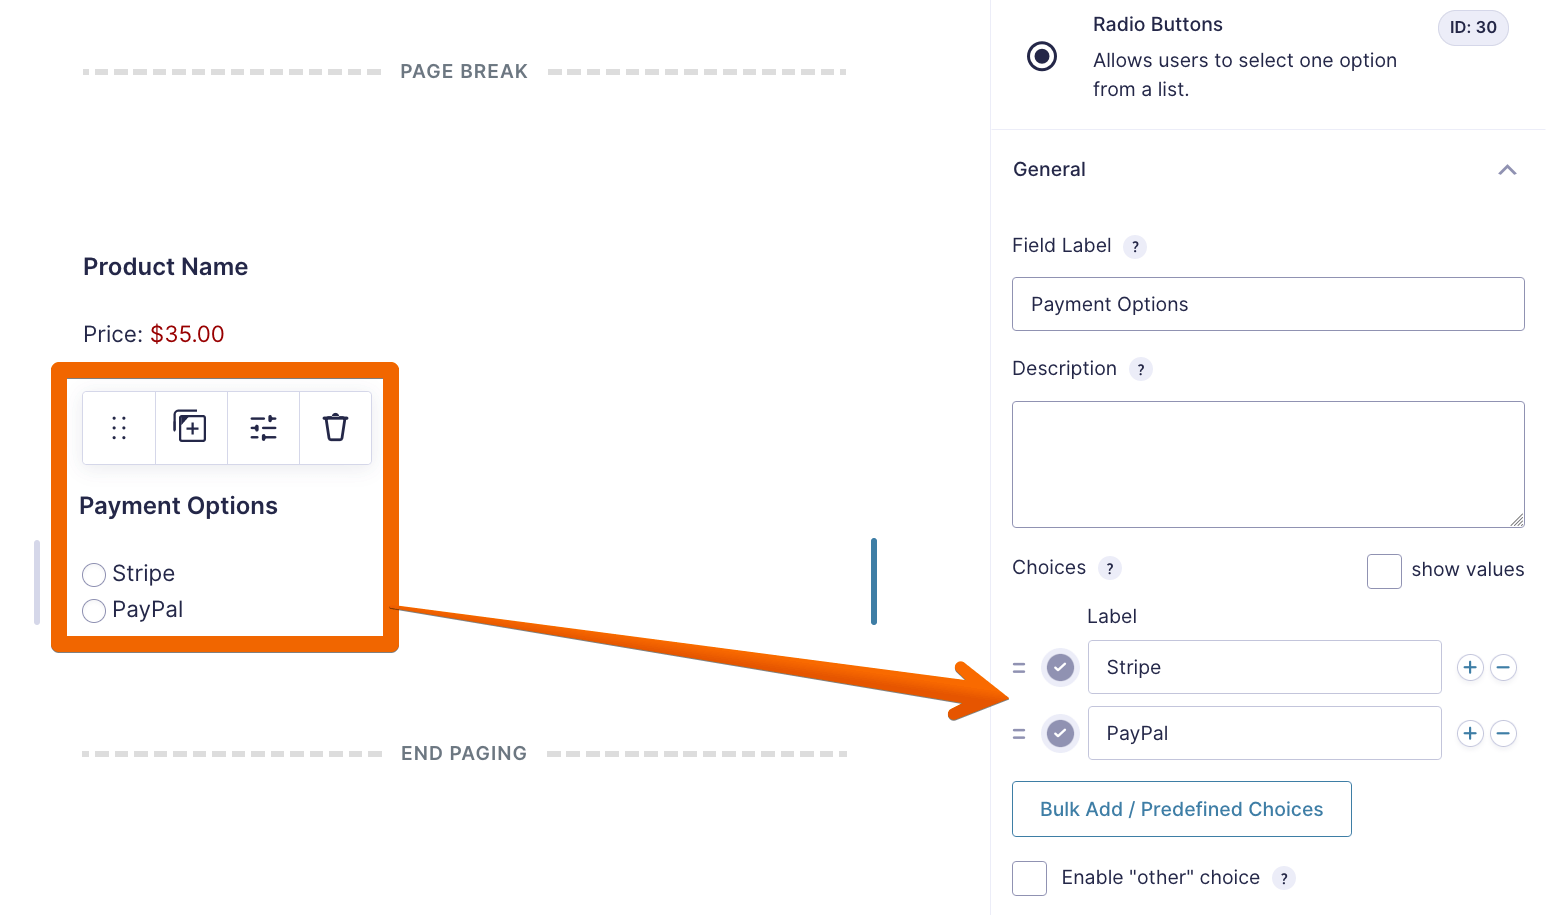 The first step is to edit the form and add a new Radio Button field which will include the payment options I want to offer the user. Go ahead and add Stripe and PayPal as our two choices and make it a Required field. Save the form when done.
From the admin area, go to your Gravity Forms Add-Ons page, and download and install the Stripe Add-On.  Head to the Gravity Forms Settings page and select Stripe. Connect your Stripe account to begin the setup process. When configuring for the first time, it’s recommended to select Test mode so you can test the form without actual charging a real credit card. Once you’re 100% happy with the workflow you’ve built then you can switch over to Live mode.
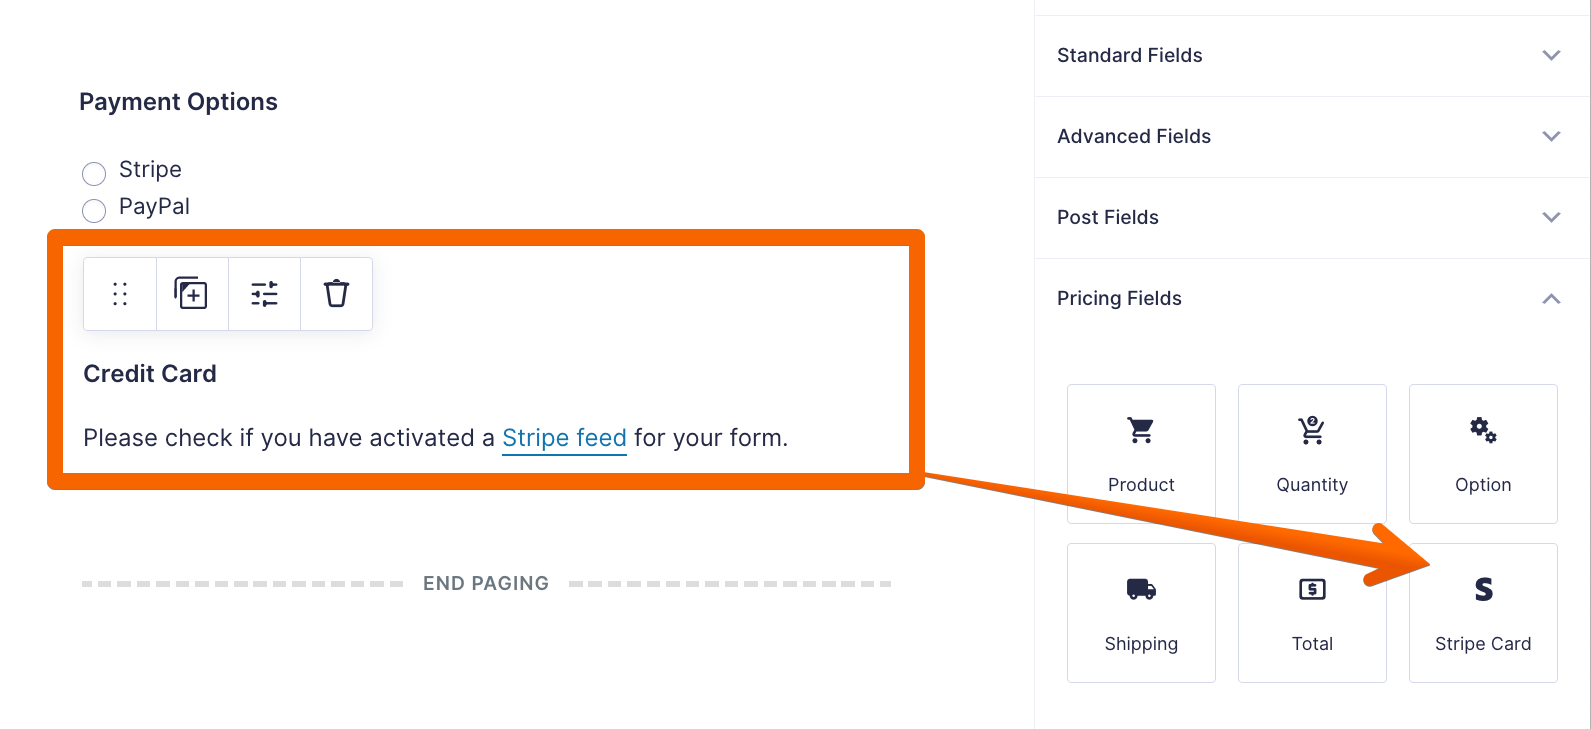
Now go back to edit your form, add a Stripe Card Field located under the Pricing Fields section.
The most important step to configuring conditional payments is to enable Conditional Logic on the feed, which is located in the Other Settings section. Set a condition to process the feed only if Stripe is selected in the Payment Options radio button.
Once you’re done setting up, click Add/Update Settings to save these changes.
 Test everything works correctly by submitting the form, selecting Stripe as the payment type and entering one of the test card numbers Stripe provides. Once submitted, verify Gravity Forms logged the payment by going to the Entry Detail page of your newly-submitted entry, scroll down to the Entry Notes and check for a note letting you know the payment has been completed. 👍
Much like the Stripe add-on, configuring PayPal Checkout is a very similar process. From the admin area, go to your Gravity Forms Add-Ons page, and download and install the PayPal Checkout Add-On. Head to the Gravity Forms Settings page, connect your PayPal account to begin the setup process. When configuring for the first time, it’s recommended to connect to the Sandbox environment so you can test the forms without affecting your live PayPal account. Once you’re ready to take live payments, switch to the Live environment.

 Now go back to edit your form, add a PayPal field located under the Pricing Fields section, and configure as needed.
Scroll down to the Other Settings section of the setup page and enable Conditional Logic. Set a condition to process the feed only if PayPal is selected in the Payment Options radio button.
Once you’re done setting up, click Add/Update Settings to save these changes.
Now submit a final form entry with the PayPal payment method selected and use one of PayPal’s test card numbers. If successful, a payment completed note is added on the Entry Details page. sample entry and go to the Entry Detail page.
